- Published on
Install Arch Linux and dual boot with Windows - UEFI
- Authors

- Name
- Cristian Encalada

This guide will help you to install Windows and Arch Linux with dual-boot and custom boot partition size.
Linux is an excellent operative system talking about software development, but sometimes we need specific tools or games which only run on Windows, and even tough there are software such as Wine or Proton, the most simple solution to this problem is to have a dual boot with Windows and whatever Linux distribution you prefer.
Table of contents
- 0. Pre-requisites
- 1. Unallocate space for Arch
- 2. Create an Arch bootable USB drive
- 3. Boot From the USB Device
- 4. Install Arch Linux
- 5. Install the Grub bootloader
- 6. References
Pre-requisites
- Windows 10 or Windows 11 installed -> Windows downloadd page
- A stable internet connection (via ethernet or wifi)
- A USB drive to create a bootable device to install Arch (minimun with 1 GB storage)
- Basic knowledge of command line interface (CLI) and text editors (vim or nano)
Unallocate space for Arch
Windows creates by default 3 partitions:
- EFI [100 MB] - also known as boot partition or EFI System
- Recovery [~500 MB] - Windows recovery environment
- System [NTFS] - primary partition on which Windows is installed (Typically C: drive)
In my case, I have a 1 TB HDD (~931.5 GB) with the 3 partitions and one additional NTFS partition for other files in Windows 10:
Initial Windows partitions:
- [EFI] System(1GB) - boot partition
- [WIN] C: Primary (~200GB) for Windows
- [WIN] D: Data (~500GB) for other files on Windows
The first thing that we need to do, is create some unallocated space to install Arch Linux (or any othe rdistribution).
On Windows:
- Right click on My PC -> Manage -> Storage -> Disk Management
- Right click on the partition where Windows is installed (by default C:) -> Shrink Volume
- Shrink volume will automatically calculate the maximum space that you can shrink, you also can enter the size you want to shrink, in our case we will have 200GB unallocated for Arch Linux, so, enter 200000 MB and then select [Shrink]
Windows partitions after shrink:
- [EFI] System(1GB) - boot partition
- [WIN] C: Primary (~200GB) for Windows
- [WIN] D: Data (~500GB) for other files on Windows
- [ARCH] Unallocated (215 GB)

Note: In the image above, the 200 GB are not unallocated because I already have Linux installed. Initially will be unallocated space, for some other reference images, check -> Create a separate partition for installation of Arch Linux.
Create an Arch bootable USB drive
A bootable live USB is an external storage device that contains everything required to boot into a live environment/setup. There are multiple ways to create such a live environment; the classic way is do it with a USB drive.
First we need a USB drive with the Arch ISO file (An ISO file is an exact copy of an entire optical disk such as a CD, DVD, or Blu-ray archived into a single file, for more info, check What Is an ISO File? Explained in Plain English) .
We can create the Arch live booteable in the USB drive using some software like Rufus or Balena Etcher.
Create the live booteable USB using Rufus:
Download the Arch Linux ISO file (Torrent download) -> Arch download page
Download and install Rufus on Windows -> rufus-4.2.exe:
Select the following options in
Drive Properties(Format Options by default):- Device: Your USB device
- Partition scheme: GPT
- Target system: UEFI (non CSM)

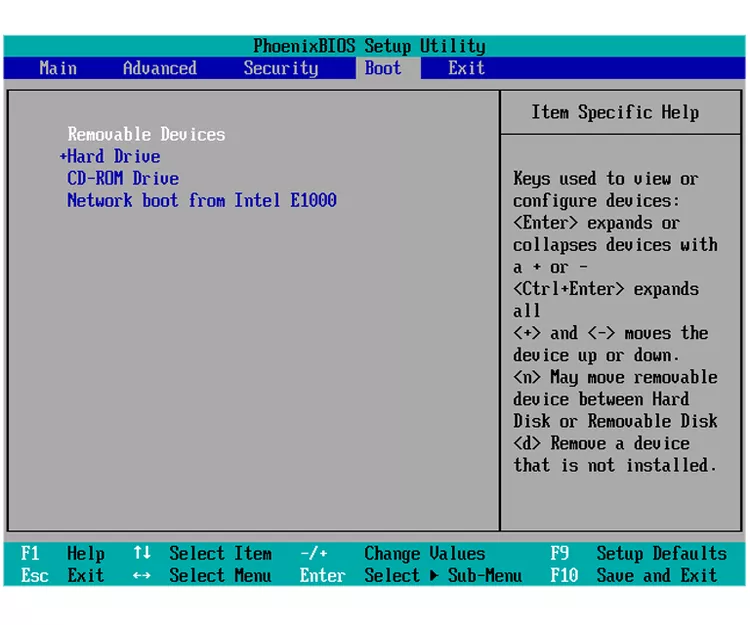
Boot From the USB Device
Follow these steps to boot from a flash drive, an external hard drive, or some other bootable USB device.
Change the boot order in BIOS so the USB device option is listed first. The BIOS is rarely set up this way by default. (If the USB boot option is not first in the boot sequence, your PC will start "normally" (i.e., boot from your hard drive) without even looking at any boot information that might be on your USB device)
Attach the USB device to your computer via any available USB port.
Save the BIOS boot order changes and restart the computer.
Install Arch Linux
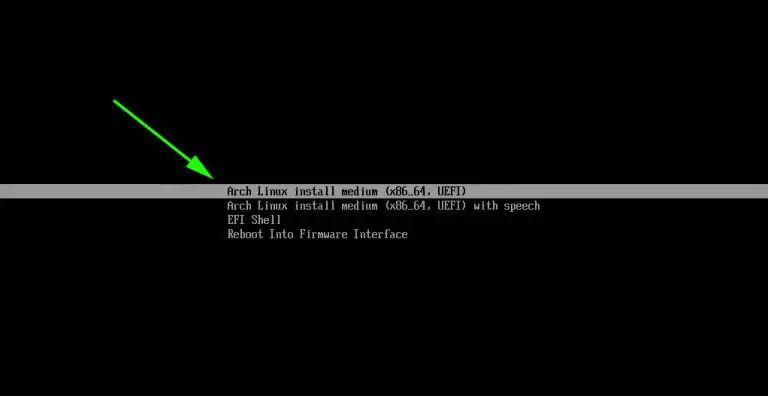
1. Begin the installation of Arch Linux
On the bootup screen, you will be presented with options as shown below. Select the first option – Arch Linux install medium (x86_64, UEFI) and hit ENTER.
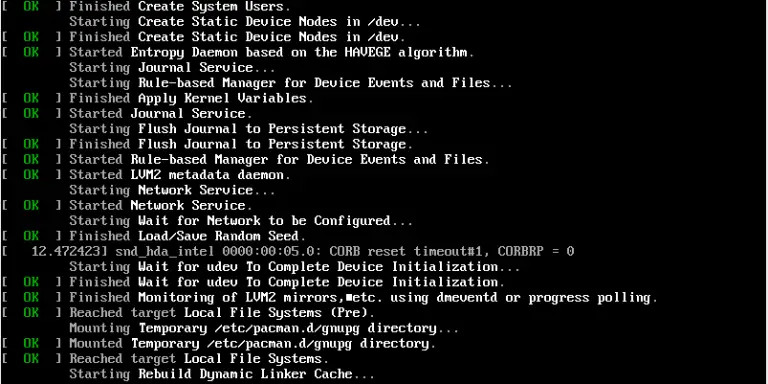
This initialize Arch Linux as evidenced by the boot messages on the screen.
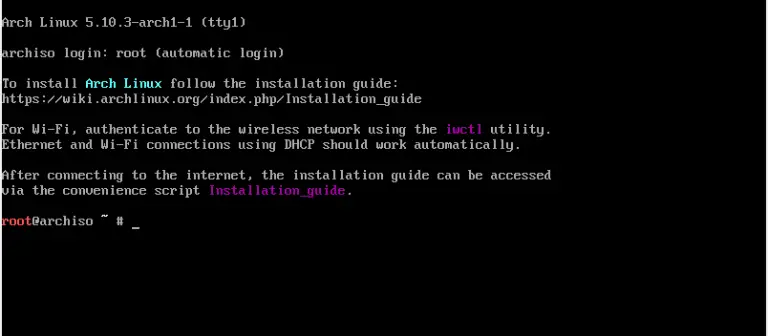
After a few seconds, the root@archiso prompt should be shown as below.
To verify the EFI support, run this command:
ls /sys/firmware/efi/efivars
You should get some entries on the screen as shown. If nothing is listed on your screen, then it means you are using MBR and this guide won’t work for you in configuring up a dual boot setup.
AcpiGlobalVariable-c020489e-6db2-4ef2-9aa5-ca06fc11d36a    Lang-8be4df61-93ca-11d2-aa0d-00e098032b8c
ActiveVgaDev-59d1c24f-50f1-401a-b101-f33e0daed443          LegacyDevOrder-a56074db-65fe-45f7-bd21-2d2bdd8e9652
AdministerSecureBoot-59d1c24f-50f1-401a-b101-f33e0daed443  LoaderDevicePartUUID-4a67b082-0a4c-41cf-b6c7-440b29bb8c4f
AuthVarKeyDatabase-515fa686-b06e-4550-9112-382bf1067bfb    LoaderInfo-4a67b082-0a4c-41cf-b6c7-440b29bb8c4f
BackupLang-59d1c24f-50f1-401a-b101-f33e0daed443            MrcS3RestoreVariable-14ef381c-9721-434e-be09-192ab97e781f
Boot0001-8be4df61-93ca-11d2-aa0d-00e098032b8c              MTC-eb704011-1402-11d3-8e77-00a0c969723b
Boot0002-8be4df61-93ca-11d2-aa0d-00e098032b8c              OfflineUniqueIDRandomSeedCRC-eaec226f-c9a3-477a-a826-ddc716cdc0e3
Boot0003-8be4df61-93ca-11d2-aa0d-00e098032b8c              OfflineUniqueIDRandomSeed-eaec226f-c9a3-477a-a826-ddc716cdc0e3
Boot0004-8be4df61-93ca-11d2-aa0d-00e098032b8c              OsIndications-8be4df61-93ca-11d2-aa0d-00e098032b8c
Boot2001-8be4df61-93ca-11d2-aa0d-00e098032b8c              OsIndicationsSupported-8be4df61-93ca-11d2-aa0d-00e098032b8c
Boot2002-8be4df61-93ca-11d2-aa0d-00e098032b8c              PBRDevicePath-a9b5f8d2-cb6d-42c2-bc01-b5ffaae4335e
2. Connect to wifi or ethernet network
We need to ensure to have internet connection in order to setting time and date and installing the base linux and some packages.
To connect to the ethernet, simply plug in the ethernet cablee and that's all.
To connect to a wifi network, we can use iwd (iNet wireless daemon), it comes in the Arch ISO, so, excute this command:
iwctl
Use the daemon
iwd
device list
station wlan0 get_networks
station wlan0 connect <networkName>
You can ping Google site to verify the connection:
ping google.com -c 4
output
PING google.com (142.251.133.14) 56(84) bytes of data.
64 bytes from eze10s01-in-f14.1e100.net (142.251.133.14): icmp_seq=1 ttl=113 time=11.0 ms
64 bytes from 14.133.251.142.in-addr.arpa (142.251.133.14): icmp_seq=2 ttl=113 time=13.8 ms
64 bytes from 14.133.251.142.in-addr.arpa (142.251.133.14): icmp_seq=3 ttl=113 time=11.6 ms
64 bytes from 14.133.251.142.in-addr.arpa (142.251.133.14): icmp_seq=4 ttl=113 time=13.4 ms

--- google.com ping statistics ---
4 packets transmitted, 4 received, 0% packet loss, time 3001ms
rtt min/avg/max/mdev = 10.962/12.447/13.828/1.207 ms
3. Update time and date
Find your timezone ("q" to stop listing)
timedatectl list-timezones
output:
Africa/Abidjan
Africa/Accra
Africa/Addis_Ababa
Africa/Algiers
Africa/Asmara
Africa/Asmera
Africa/Bamako
Africa/Bangui
Africa/Banjul
Africa/Bissau
Africa/Blantyre
Africa/Brazzaville
Africa/Bujumbura
Africa/Cairo
Africa/Casablanca
...
In my case, my timezone is America/Montevideo, so, let's set the timezone with this command:
timedatectl set-timezone America/Montevideo
Verify your timezone
timedatectl status
output:
               Local time: Sun 2023-10-08 12:21:33 -03
           Universal time: Sun 2023-10-08 15:21:33 UTC
                 RTC time: Sun 2023-10-08 15:21:33
                Time zone: America/Montevideo (-03, -0300)
System clock synchronized: yes
              NTP service: active
          RTC in local TZ: no
4. Create the Linux partitions
Important: Be very careful with this section, because selecting or using the wrong partitions could remove the windows files/folders and cause data loss, backup your important data before continue
Verify your current windows partitions (list block devices), with this command:
lsblk
output:
NAME   MAJ:MIN RM   SIZE RO TYPE MOUNTPOINTS
sda      8:0    0 931.5G  0 disk
├─sda1   8:1    0   100M  0 part
├─sda2   8:2    0    16M  0 part
├─sda3   8:3    0   200G  0 part
├─sda4   8:4    0   522M  0 part
├─sda5   8:5    0 516.3G  0 part
Another opton to verify the windows partitios is the command:
fdisk -l
output:
Disk /dev/sda: 931.51 GiB, 1000204886016 bytes, 1953525168 sectors
Disk model: TOSHIBA MQ01ABD1
Units: sectors of 1 * 512 = 512 bytes
Sector size (logical/physical): 512 bytes / 512 bytes
I/O size (minimum/optimal): 512 bytes / 512 bytes
Disklabel type: gpt
Disk identifier: E76D7293-6FAD-AEDB-6170-BD964057BFAD

Device          Start        End    Sectors   Size Type
/dev/sda1        2048     206847     204800   100M EFI System
/dev/sda2      206848     239615      32768    16M Microsoft reserved
/dev/sda3      239616  419589290  419349675   200G Microsoft basic data
/dev/sda4   419592192  420661247    1069056   522M Windows recovery environment
/dev/sda5   420663296 1503373311 1082710016 516.3G Microsoft basic data
A simple way to create the partitions is using the cfdisk utility. Run the command:
cfdisk
This displays all the partitions available including Windows partitions.
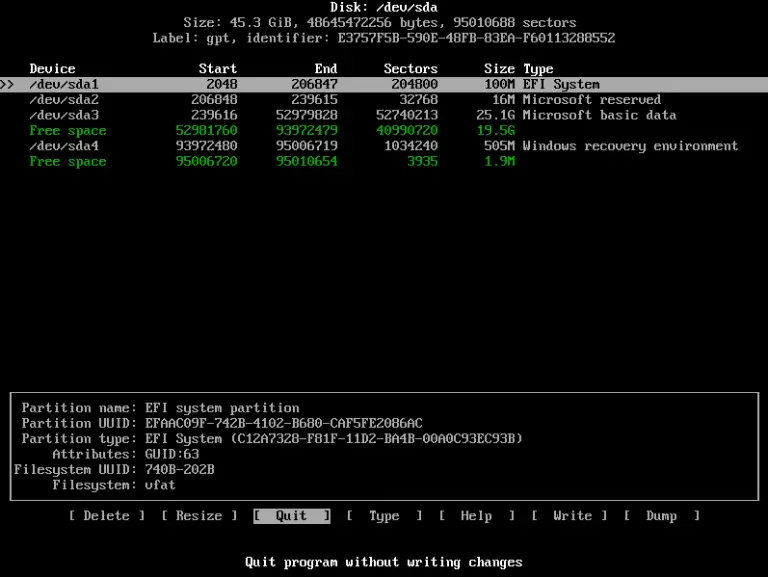
As you can see, there is some free space, created earlier from shrinking drive C on the Windows side. Using this partition, we shall create the following Linux partitions (home is optional):
- root -> 50 GB
- swap -> 15 GB
- home -> 150 GB
Create the root partition
To achieve this, navigate to the free space with and hit ENTER. We will then specify the Partition size: 50G for the root partition. Then hit ENTER.
The root partition will be created with the Linux filesystem type.
Create the home partition
To achieve this, navigate to the remaining free space with and hit ENTER. We will then specify the Partition size: 200G for the home partition. Then hit ENTER.
The root partition will be created with the Linux filesystem type.
Create the swap partition
To achieve this, navigate to the remaining free space with and hit ENTER. We will then specify the Partition size: 14G (all the remaining) for the swap partition. Then hit ENTER.
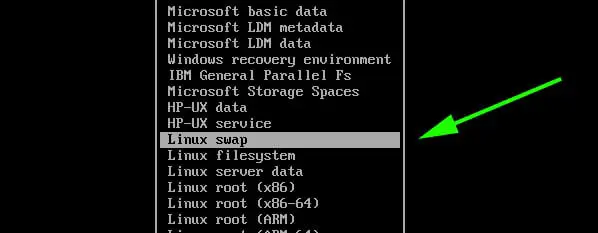
Since this will be our swap partition, we need to go the extra step and modify the partition type. Therefore, we will select the type option and hit ENTER.
In the list that appears, select Linux Swap and hit ENTER.
At this point, both the root and Linux swap partitions are created
To save the partitions, select the Write option and hit ENTER.
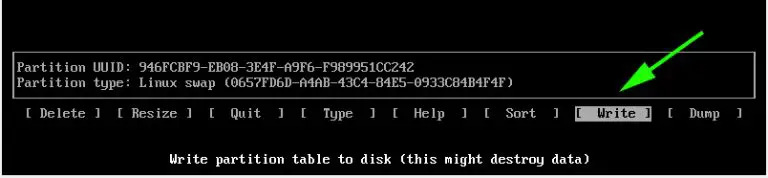
When prompted if you want to write the partition to disk, simply type yes and hit ENTER.

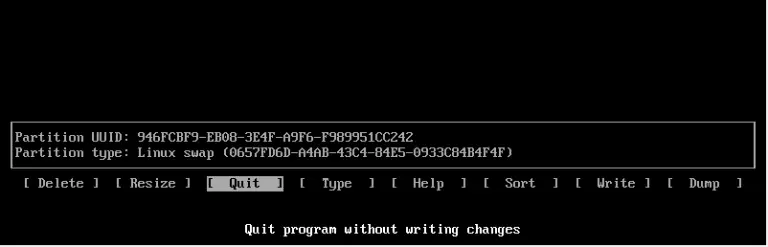
To exit cfdisk utility, select the Quit option and hit ENTER.
Verify that all linux partitions were created properly, use this command:
lsblk
NAME   MAJ:MIN RM   SIZE RO TYPE MOUNTPOINTS
sda      8:0    0 931.5G  0 disk
├─sda1   8:1    0   100M  0 part
├─sda2   8:2    0    16M  0 part
├─sda3   8:3    0   200G  0 part
├─sda4   8:4    0   522M  0 part
├─sda5   8:5    0 516.3G  0 part /mnt/windows-sda5
├─sda6   8:6    0    50G  0 part
├─sda7   8:7    0   150G  0 part
└─sda8   8:8    0  14.6G  0 part [SWAP]
5. Format the linux partitions
Important: Be very careful with this section, because selecting or using the wrong partitions could remove the windows files/folders and cause data loss, backup your important data before continue
For the partitions to become usable and available for use, we need to format them and later mount them.
To format the root partition, run the command:
mkfs.ext4 /dev/sda6
To format the home partition, run the command:
mkfs.ext4 /dev/sda7
To format the swap partition, run the command:
mkswap /dev/sda8
Then enable swap using the swapon command shown:
swapon /dev/sda8
6. Mount the linux partitions
Next, we need to mount the root partition to the /mnt directory
mount /dev/sda6 /mnt
mount the root partition to the /mnt/home directory
mount /dev/sda7 /mnt/home
Verify that root and home linux partitions were mounted properly, use this command:
lsblk
NAME   MAJ:MIN RM   SIZE RO TYPE MOUNTPOINTS
sda      8:0    0 931.5G  0 disk
├─sda1   8:1    0   100M  0 part
├─sda2   8:2    0    16M  0 part
├─sda3   8:3    0   200G  0 part
├─sda4   8:4    0   522M  0 part
├─sda5   8:5    0 516.3G  0 part
├─sda6   8:6    0    50G  0 part /
├─sda7   8:7    0   150G  0 part /home
└─sda8   8:8    0  14.6G  0 part [SWAP]
7. Install base Linux and linux-firmware
Next, we are going to install the central packages for our Linux system including the base, Linux-firmware packages and some basic packages such as sudo, nano, vim, git networkmanager, dhcpcd and pulseaudio. That is going to take quite some time depending the internet connection speed.
pacstrap /mnt base linux linux-firmware sudo nano vim git networkmanager dhcpcd pulseaudio
Brief explanation what are the extra Linux packages are for:
sudo: stands for "superuser do" and is a command that allows authorized users to execute commands as the superuser or another user, as specified by the security policy. It is commonly used to perform administrative tasks that require elevated privileges. For example, you can use sudo to install software, configure system settings, or perform other system maintenance tasks.nanoandvim: text editors for the command line.git: version control system used for tracking changes in source code during software development.networkmanager: is a Linux utility that simplifies the management of network connections. It provides a graphical and command-line interface to configure and control network settings, including wired, wireless, and mobile broadband connections.dhcpcd: is a DHCP (Dynamic Host Configuration Protocol) client daemon for Linux. It automatically configures network interfaces by obtaining IP addresses, DNS servers, and other network-related information from a DHCP server. This tool is commonly used to set up network connections on Linux systems.pulseaudio: is a sound server for Linux and Unix-like operating systems. It allows multiple applications to use audio simultaneously and provides features like volume control, audio redirection, and network audio streaming.
8. Generate a file system table (fstab)
The /etc/fstab file in Linux is used to configure and maintain information about the file systems (disk partitions or network shares) that should be automatically mounted at system startup.
Now we will generate the fstab file on the /mnt directory, use this command:
genfstab -U /mnt >> /mnt/etc/fstab
9. Configure root user (newly installed system)
Navigate to the newly created root filesystem
arch-chroot /mnt
You can verify that you are in the root filesystem using this command:
ls
Set a password for the root user
passwd
10. Create a new standard user
Create a new user:
useradd -m <new_user>
Set a password for the new user:
passwd <new_user>
Add the new user to the groups wheel, storage and power:
usermod -aG wheel,storage,power <new_user>
Execute this command:
visudo
Remove the comments (#) from these 2 lines (ESC and !x to exit and save the changes):
%wheel ALL=(ALL:ALL) ALL
Defaults timestamp_timeout=0
11. Set up the system language
The locale determines the system language, currency format, numbering and date on your system. This information is contained in the /etc/locale.gen file. So, open the file using the vim editor.
vim /etc/locale.gen
Once you have accessed the file, scroll and uncomment your preferred locale. In this case, we have decided to go with en_US.UTF-8 UTF-8
Save and exit the file. Next generate the locale configuration using the command.
locale-gen
Next, create a new locale configuration file and save the locale as shown.
echo "LANG=EN_US.UTF-8" > /etc/locale.conf
export "LANG=EN_US.UTF-8"
12. Set up the hostname
Next, we are going to configure the hostname of our Arch System.
First, create a new file and specify the hostname as shown.
echo Arch > /etc/hostname
Modify the /etc/hosts file as follows.
vim /etc/hosts
hosts file:
127.0.0.1 localhost
::1 localhost
127.0.1.1 Arch.localdomain localhost
13. Set up the timezone and region
Time zone information is found in the /usr/share/zoneinfo/ directory. To set your timezone, create a symbolic link to the /etc/localtime path.
Find your timezone ("q" to stop listing, ENTER to continue listing)
timedatectl list-timezones
output:
Africa/Abidjan
Africa/Accra
Africa/Addis_Ababa
Africa/Algiers
Africa/Asmara
Africa/Asmera
Africa/Bamako
Africa/Bangui
Africa/Banjul
Africa/Bissau
Africa/Blantyre
Africa/Brazzaville
Africa/Bujumbura
Africa/Cairo
Africa/Casablanca
...
In my case, my timezone is America/Montevideo, so, let's set the timezone with this command:
Execute this command:
ln -sf /usr/share/zoneinfo/America/Montevideo /etc/localtime
Sync the hardware clock using the command:
hwclock --systohc
Install the Grub bootloader
The boot partition (EFI System Partition) contains the bootloader which is responsible for booting the system. When dual booting, we create a single boot partition and load the entries for both the operating systems in one bootloader so that it's easier to select the option we want.
Find the windows EFI partition (~100 MB):
lsblk
NAME   MAJ:MIN RM   SIZE RO TYPE MOUNTPOINTS
sda      8:0    0 931.5G  0 disk
├─sda1   8:1    0   100M  0 part
├─sda2   8:2    0    16M  0 part
├─sda3   8:3    0   200G  0 part
├─sda4   8:4    0   522M  0 part
├─sda5   8:5    0 516.3G  0 part /mnt/windows-sda5
├─sda6   8:6    0    50G  0 part /
├─sda7   8:7    0   150G  0 part /home
└─sda8   8:8    0  14.6G  0 part [SWAP]
In this case, the EFI partition is the sda1, so, we are going to work there.
Create a directory for the EFI partition on which we will mount the Windows EFI system which , in our case is located on the /dev/sda1 partition
mkdir /mnt/efi
Mount the EFI partition on the EFI mount point.
mount /dev/sda1 /mnt/efi
Install the grub bootloader package alongside the efi boot manager package since we are using the UEFI mode.
pacman -S grub efibootmgr
Install the os-prober package which will enable Arch Linux to detect the Windows operating system.
pacman -S os-prober
Install the ntfs-3g package, it's a read/write NTFS driver for Linux, it provides safe handling of the Windows NTFS file systems. Also the update-grub utility could be helpful in some cases where the grub update is needed.
pacman -S nfts-3g update-grub
Make sure that GRUB_DISABLE_OS_PROBER=false is uncommented to be able to detect Windows at the startup
vim /etc/default/grub
Uncomment this line (remove the #):
GRUB_DISABLE_OS_PROBER=false
Finally, install the grub on the EFI directory:
grub-install --target=x86_64-efi --efi-directory=/efi --bootloader-id=grub_uefi_arch
Install a grub configuration file as shown
grub-mkconfig -o /boot/grub/grub.cfg
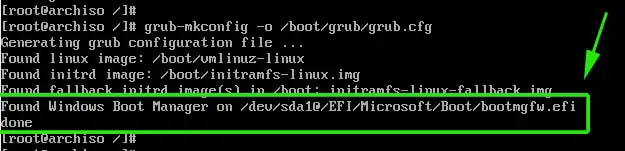
The last line is an indication that Arch has detected the presence of Windows Boot manager on /dev/sda1 partition.
Enable the dhcpcd and networkmanager services at the start of the system:
systemctl enable dhcpcd.service
systemctl enable NetworkManager.service
Done, exit and reboot the system.
exit
reboot
You can now boot into Arch linux or Windows through the GRUB bootloader:
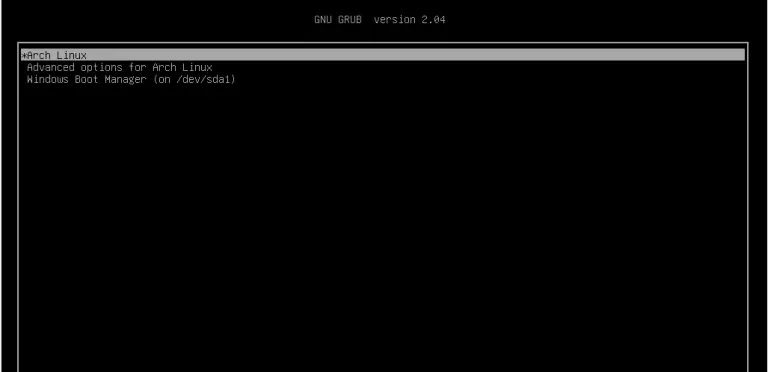
Log in as your standard user <new_user> created in the step 10.
So for we have installed Arch Linux, that was the "difficult" part, later we can install some Linux Desktop environment or only a Window manager, both are different things that will be covered in a future post.
Thanks for reading!
References
Below is a list of some references used to create this post, each of them have their own way and small variations in the steps, but overall is the same main way to install a dual boot with Windows/Linux: